Support
Faq
How do I change the batteries in my King Meter?
Are there larger fenders available for my bike?
 Of course! We use Roadrunner LX mountain fenders. They are available for purchase from us at our online store.
What if my charger output doesn't read "Output 55VDC 2A"?
Where can I recycle my old battery?
To find a recycling depot close to you, please visit:
How fast can I go on the Urban Ryder™/Cruzer™?

The default setting on the top riding speed is set to 32 km/hour or 20 mph. The top riding speed can be set from 10 km/hour to 32 km/hour by using the UP and DOWN arrows. The top riding speed in Canada is 32 km/hour (20 mph in the US) in all cities, streets and highways. Do not exceed the top riding speed of 32 km/hour as you will be breaking the E-bike speed limit law and putting yourself and others in danger, which may result in prosecution, severe injury or death.
Troubleshooting
Wobbly handlebars? How do I adjust my handlebars?
Lately, we’ve been getting a lot of correspondence about wobbly handlebars and handlebar adjustments. Please follow the directions below to adjust the handlebars:
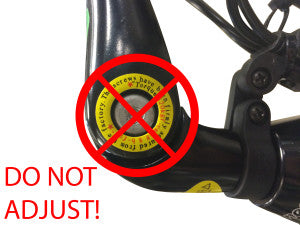
1. Do not adjust the bolt marked in red! This is a factory tightened bolt. Instead, adjust the bolt below the handlebar stem to change the angle of the handlebars.

2. You can also tighten or loosen the bolt at the top of the handlebars to adjust the height of the handlebars.
CAUTION: Make sure that you do not exceed the minimum insertion depth for the stem-wedge.

How do I remove and replace the rear wheel?
PDF download: Instructions – Remove and replace rear wheel
REMOVAL
1. Slide the rubber boot down the wire to expose the nut. On the opposite side of the wheel, remove the rubber boot.

2. Remove the chain stay protector by peeling back the Velcro.

3. Cut the 2 straps that hold the motor wire.

4. Pull the wire connector apart to the rear wheel (notice the 2 arrows for reinsertion).

5. Undo the nuts on both sides of the axel, but make sure that you keep the wire straight so the nut will not rub on the wire when loosening.


REINSTALL
1. Return the wheel to the dropout.

2. The silver washer with the locking tab must face to the ground or be on the bottom. The easiest way to accomplish this is to put a wrench on the flat part of the wheel axel and turn the axel to the correct position as you are inserting it into the dropout.

3. It is easy to see from the disc brake side if you are correctly inserting into the dropout. There should be no space at the top of the dropout. The axel must go tight to the top of the dropout.
The image below shows a wheel inserted incorrectly.

4. Tighten both axel nuts and attach the motor wire with new straps. When inserting the motor wire plug together, make sure you align the arrows or you may damage the plug.
How to set up the wire harness on your bike
PDF download: Instructions – How to set up the wire harness
Please follow these instructions for how to set up and secure the wire harness of your Urban Ryder or Cruzer to the handlebar stem.
If you have any questions or concerns, email us at contact@greenlightcycle.com or call our office at (604)-639-0059 (toll free: 1-(855)-476-7933) between the hours of 10:00am – 4:00pm Pacific, Tuesday – Friday.
Changing the Brake Configuration from Moto Style to American Style
PDF download: Instructions – Changing the brake configuration from Moto Style to American Style
Moto Style is when the Left Brake Handle controls the Rear Wheel Brakes and the Right Brake Handle controls the Front Wheel Brakes.
American Style is when the Right Brake Handle controls the Rear Wheel Brakes and the Left Brake Handle controls the Front Wheel Brakes.
To switch the configuration from Moto Style to American Style, simply follow the instructions provided in the link above. If you have any questions or concerns, email us at contact@greenlightcycle.com or call our office at (604)-639-0059 (toll free: 1-(855)-476-7933) between the hours of 10:00am – 4:00pm Pacific, Tuesday – Friday.
King Meter Program Update for Urban Ryder and Urban Cruzer
his notice is to inform you that should you have recently purchased an Urban Ryder or Urban Cruzer containing the serial number HR1612001 to HR1612201 or HC1612001 to HC1612201, from Costco.ca – SKU Number URLAD12 and model number 885083300113 or SKU number URMEN12 and model number 885083300120 – in April or May of 2017, the King Meter in your bike may not be controlling the top riding speed, which makes you eligible for a program update.
If you believe you have one of the above products, Green Light Cycle Ltd. is voluntarily offering a King Meter program update. Please call Green Light Cycle Ltd. at 1-855-476-7933 to order an updated King Meter or send your King Meter to Green Light Cycle Ltd. 6909 Antrim Ave. Burnaby, BC, V5J 4M5 to be updated.
Please rest assured that the King Meter will function for its intended purposes and is safe to use. As a result of our oversight, you can receive an update to the KM program, at no charge.
Please accept our apologies for any inconvenience or confusion that you may have experienced as a result.
If you have any questions or concerns, email us at contact@greenlightcycle.com or call our office at (604)-639-0059 (toll free: 1-(855)-476-7933) between the hours of 10:00am – 4:00pm Pacific, Tuesday – Friday.